Dodgy 240v socket wiring

The habitation report that was done on the motorhome in August 2016 noted that the 240v electric socket didn’t work when tested, so we knew it needed repairing. There were a few other jobs that needed to be done as well so we contacted a local mobile motorhome repairer.

P1120286

no earth!

The strange thing is that under the worktop there is a factory fitted 240v junction box, this meant it was an easy fix with discreet wiring that can’t be seen.

We are safe now and it’s another job done.

Dave

Dash Cam purchased & installed

We had a dash camera installed at the same time as the reversing camera by Lee of DB Audio as it seemed to make sense to have both jobs done at the same time (September 2017).

My mind was on european driving and if were involved in an incident, hopefully we won’t, but having a recording could make our lives a whole lot easier.

I bought a Nextbase dash cam model No. 212 via eBay, it was a refurbished unit from a recommended seller for just £36 against a new unit for £69. it arrived and it looked brand new with no marks or scratches, it even had the the thin film over the screen.

dash cam1

Also purchased a genuine Nextbase hard wire kit for the dash cam via eBay for £11.99 saving £8 against the normal price of £19.99.

Having it hard wired to the vehicles ignition meant that I don’t have to fiddle about with 12v chargers leads, cigarette lighter points and messy wires. Wanted it to be easy to use with a minimum of fuss, it’s a great little unit and don’t forget to buy the correct SD micro card.

dash sat nav

Once mounted it does not obscure our view through the massive windscreen and we don’t notice it’s there now.

The installation and hard wiring by Lee at DB Audio cost £110 and he did a very neat and tidy job with no wires on view, thanks Lee.

Dave

Exhaust problem!

During September 2017 I was casually looking around Pogo and spotted a weak rusty exhaust bracket, looks like yet another repair is needed.

Later that day I took the van to the local ATS, about 5 miles away for an inspection and get the bracket replaced before the exhaust fell off. The guy at ATS said the exhaust is unusual because it’s a right hand system that been adapted for the left hand drive vehicle, urm I am not sure about that I thought. Next he said the bracket can’t be purchased separately as it is part of the exhaust system, therefore I need a whole new exhaust system or maybe have it welded, ok I said can you weld it please? Ah, we don’t do welding here, you need to find someone else. Can you recommend anybody, err, no sorry.

Once more we have a problem to sort out, I started ringing around and the MOT station I used last month said they would have a look and if it can be done, give me a quote. Made an appointment for next week, they are too busy this week.

I drove Pogo to the MOT station the following week and they quote me 1-2 hours work to weld and make good, using a knurled bar and some skill, can you bring the van back in 5 days time.

Job done a few days later, the welding is of a high standard and I am pleased with the work undertaken by Dan at MOT Northwest, cost £54 including VAT, I am happy once more!

exhaust1

A neat welding job

It’s great having a local, friendly company nearby that can do jobs like this.

Dave


Alternator problem!

During August 2017 our motorhome went in for the annual MOT, although it passed the tester called me over, we got under the van and he highlighted a potential problem.

Using his torch he pointed upwards and said can you see the alternator up there? yes, well the long bolt holding securing it to the sub frame has worked loose and it’s just hanging on, that’s an accident waiting to happen!

Can you fix it here? No sorry we don’t do that type of work, ok I said. Called Peter at GEP Motors and arranged for it to be repaired there next week, but I didn’t fancy driving the van to be honest.

A week later after the repair we went to collect Pogo, Peter showed me the alternator belts and said we were lucky as they were badly damaged and it was only a matter of time before they snapped off or the alternator fell off.

altenator

The bolt has slipped to the right, no nut, dangerous!


I felt better now that this potential problem has been fixed and we can drive with peace of mind, this could have fell off on our journey to Lincoln a few weeks ago and that’s a scary thought, maybe we had a lucky escape!

The repair cost was £119 including VAT, once again great service.

A few days later I popped back to MOT Northwest with a four pack of lager for the Paul the tester, I explained I was grateful to him for discovering the problem, he was surprised and taken aback, well it’s not often customers come back with gifts!

I didn’t know then that I would be back for more repair jobs!

Dave

Four New Tyres

It’s time for some new motorhome tyres (September 2017).

The reason for wanting a set of new tyres is;

  • the tyres are too old now, date stamped 2009, sailed through the MOT in August though
  • but good tread depth of 7mm all round
  • no M&S (mud & snow) markings or snowflake symbol on the tyre, required for Germany and Austria in winter months
  • confidence i.e. not driving on old tyres

After reading and researching all about tyres I can see why this subject can become a bit confusing and hazy. There is a lot of opinion, reasons, personal preferences, price, quality, braking distance, grip on wet grass, rain, snow, wear ratio and so it goes on.

Whilst reading the forums Brian’s name kept cropping up as the man to ask, he owns a tyre business and is a motorhomer, a perfect combination. I contacted Brian at P&B Tyres through the forum page and we chatted over the phone. During the discussion he listened to me thoughts, he asked all the relevant questions, tyre age, winter markings, weight of the van, spare, size of the tyre. Brian was really helpful, knowledgeable and patient & made me feel at ease,  he suggested I thought about it for a few days and to contact him again if I wanted any further info, there was no hard sell.

Over the next few days I looked at the tyres and specifications that Brian mentioned and in particular the Continental and Evergreen brands. We chatted once more as I still wasn’t sure and I then chose four Evergreen tyres and arranged a fitting date.

  • EW616 Tyre
  • Tyre size 215/75/16R
  • Radial
  • M&S markings with a snowflake symbol
  • 10 ply – other brands were 8 ply
  • 4 new tyres cost £352 including VAT, fitting etc

Brian mentioned that almost 90% of the worlds tyres are manufactured in China including the popular, expensive and recognised brands, Evergreen are an up and coming company focused on tyre development and product enhancement, they also provide a tyre life guarantee, click here to view this.

We made our way to Oswestry to have the tyres fitted and made a little outing of it, we did some wild camping and visited beautiful spots, click here for our trip.

P1120558

Pogo at P&B Tyres

I am pleased with the tyres and recommend Brian at P&B Tyres, fantastic service, great guy, very helpful and knowledgeable.

Dave


LPG Refillable System

In one of the motorhome lockers there are two 7kgs calor gas bottles. These bottles provide gas to a Truma heater/boiler/water unit and provides hot water and blown hot air heating inside the van, the gas is used also for the 3 ring cooker hob and cools the fridge.

After reading motorhome blogs about travelling through Europe and some research we decided to install a LPG refillable system.

We like the convenience of using just one LPG system on the motorhome and avoid buying different LPG bottles in different countries.

Having two bottles and use one at a time, close one off at the valve on the top of the bottle and use the other one. When the first one runs out, switch to No.2 and fill up at your next opportunity.

On the many forums the LPG discussion boards are full of comments, ideas and personal preferences. The most common systems seem to be Gas It and Gaslow, Alugas & Prakto. Each one has merits and drawbacks and there didn’t seem much differentiation, apart from maybe Alugas as their bottles are aluminium so therefore lighter than the others.

However, the dimensions of the gas locker meant there was only two choices for us due to height of the locker at 580mm plus a smaller upper recess rising to 600mm. We were looking at the 10-11kg bottle size.

For your information, the bottle heights were;

Gaslow – 580mm, click here

Alugas – 600mm, click here

Prakto – 550mm, click here

Gas It – 550mm, click here

The full kit quotes in 2016 for two 11kg bottles and hoses were circa £450, plus a further £110 – £140 for installation by a professional.

I had to buy a 7kg calor gas bottle recently and paid £22.50 from our local garage (we didn’t have the LPG system then) and LPG at the pump was 58 pence per litre.

We realised that the purchase of an LPG refillable system wouldn’t really pay for itself, it would take a lot of refills over a long time before it broke even. This was solely about the convenience, hassle-free fill top ups with the minimum of fuss at petrol and service stations.

We weren’t in a rush, but I kept an eye on the adverts for both Gas It and Prakto systems, when a classified advert on Motorhome Fun popped up; for sale 2 x Prakto 10.5 kg bottles with some hoses. I made contact and we agreed a price £180.

I called Autogas 2000 and was told the price of two Prakto bottles was £390 and in fact they fitted this system 6 weeks earlier and this was confirmed by the seller. Autogas 2000 quoted about £100 to install including the refill point in the body not the skirt.

Be aware that all LPG refillable bottles are date stamped and are good for up to 10 years.

There are two types of filler points available to you, internal and external;

1) a filler point mounted internally on a bracket or similar inside the locker, open your locker door and fill up or

2) a filler point mounted externally in the skirt or body of your van, no need to open the locker.

We went with option two, the filler point was mounted flush in the body like a fuel tank cap.

P1020595

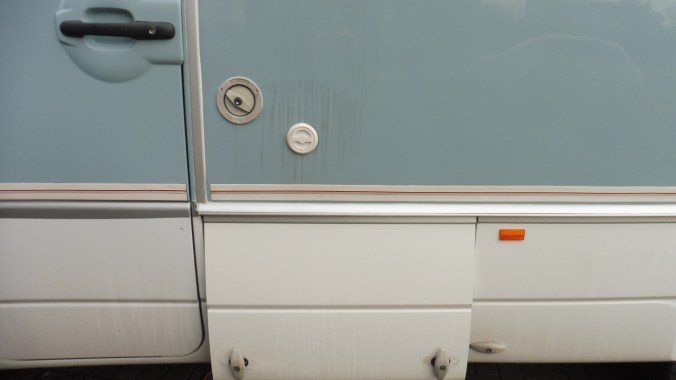
Small white cap is the gas refill point, I should have washed the van!

For £138 including VAT, Autogas 2000 installed a white flush filler cap, my Prakto bottles and 3 gas filling adaptors for use abroad.

Therefore, the total cost was £318 excluding diesel costs to Lockerbie and Thirsk. You can read about the Lockerbie trip here and the Thirsk here.

The pipework had to be boxed in though because the hoses came through the body in to an interior locker and dropped down in to the gas external locker.

We now have 42 litres of LPG so it will last a reasonable time between top ups.

P1020594

Overall, I think we got a bargain.

NOTE;

How to put LPG in your refillable system;

  • Wearing gloves is advisable
  • Put the LPG nozzle on to your filler, inside the nozzle there are two slots, line these up with the two prongs on your filler.
  • Twist the aluminium sleeve on the nozzle a quarter turn to the right, it should lock on.
  • Squeeze the LPG trigger upwards, keep it there and with your other hand flick the clip inside the holster handle to lock the trigger in the up position.
  • Release your hands, the nozzle will remain attached and in position on its own.
  • Now on the LPG pump housing press and keep your hand pressed down on the button, this releases the gas through the nozzle.
  • It will cut out/off automatically when the bottles are full.
  • The trigger will release and return to its down/normal position.
  • Twist the aluminium sleeve nozzle a quarter of a turn to the left to release.
  • Replace nozzle in to the pump housing holster.


Dave

Ahh, that’s music to my ears!

Wednesday 7th Feb 2018


radio2

At last!

Lee from DB Audio came late afternoon yesterday and removed the old radio and replaced it with our “new” one – PURE H260dbi. Very happy with the standard of work and the quality of the radio, we can’t wait use to all the features, CD, DAB/FM/MW, Aux, USB and Bluetooth. The DAB radio require a DAB aerial and this has been attached to the side windscreen and provides a clear and strong signal.

Dave


Pheasant!

Tuesday 30th January 2018

Organisation day, we compiled a list of companies, people, services, businesses, bank accounts, utilities and everybody else we could think of who we need to inform about our change of address.

Whilst I was sat at my laptop in the conservatory a friendly visitor appeared in the garden.

Pheasant78

During our shakedown trips we like listening to music and the radio, but the one in the van doesn’t seem good enough, FM/AM and CD unit only, the reception is poor, the sound quality is not so good either. Sometime in the future we would like to change it for a better unit, I was casually looking through eBay at radios and I saw the exact item we wanted, a PURE Highway H260DBi, it’s DAB, FM, AM, with CD, iPod, iPhone, USB and Bluetooth unused and brand new for £75, the usual retail price is around £129.99. The reviews look good, I sent the advert to Lee at DB Radio who did our reversing camera and hard wired the dash cam to ask his advice and a price for fitting. Lee quoted £60 to fit, quickly back to eBay and purchased the unit and , installation appointment made for next week.

radio


The unit also came with DAB glass aerial worth £19.99, so it has ended up as a good purchase.

Dave