Reversing Camera installed

I purchased a reversing camera kit from a classified on Motorhome Fun in August for £50 including postage, another bargain.

The current reversing camera doesn’t work properly, when it does work the image is patchy in black and white plus the screen is too small.

rev cam1

7″ colour screen, good camera, wiring kit, remote control & instructions

This model clips over the interior mirror but it I plan to have it mounted on the dash near my eye line and not on the interior mirror.

It is hard wired to the ignition so it switches on upon starting the engine, I then choose to leave it on or press the off button. I don’t have it on whilst driving, it’s a brilliant add on accessory and makes reversing so much easier.

Before Lee at DB Audio came and fitted it, I made a camera bracket because I wanted the camera mounted higher for a better camera angle, plus I didnt want any holes drilled in the van.


reversing cam pos

Old camera in red, new camera in green, arrows for bolts

The new camera is to be mounted on the base of the cycle rack, the old camera in the red back has been disconnected. Off to B&Q then for angled aluminium, cost £6, back home, measured up drilled two holes to line up with the nut and bolts on the cycle rack, next drilled four holes in to the bracket to mount the camera, job done.

Mounted camera, wired through the vent, no drilling

Lee used the wiring kit, went through the fridge vent, no drilling holes in the external bodywork, along the inside of the van through the lockers towards the front, he did a very neat job with the wires hidden.

rev cam sat nav

Drivers view of the reversing camera & Sat Nav

Very chuffed with the results………

Dave


4G Wifi Broadband in the motorhome

Whilst reading the motor-homing blogs of fellow travelers in Europe access to wifi and broadband is often discussed with many suggestions and solutions. Of course you can use free wifi in shops, cafes,shopping malls, etc as you can here but we wanted; a use anytime, anywhere solution, particularly if we were wild camping and we didn’t want to move off to find wifi.

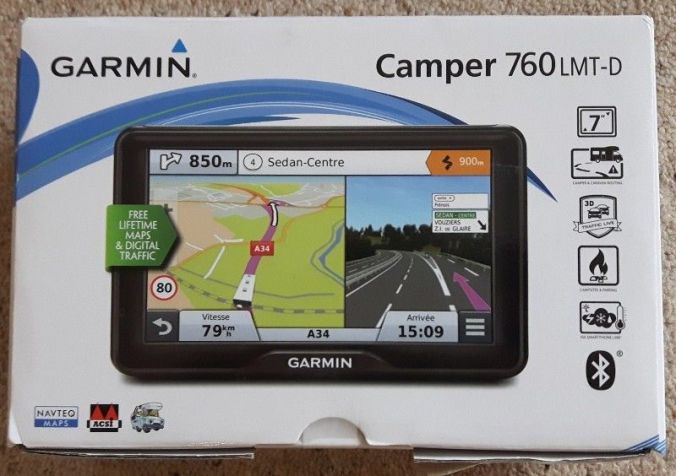
We liked the look of the 4G mobile broadband – pack 2 from motorhome wifi, looked easy to use, very good reviews and good service. The owners, Adam and Sophie are young motorhomers, they started the business after traveling through Europe and struggling to find wifi and maintaining a suitable signal & connection on the road.

Although we decided on what which companies system to buy we weren’t in a rush to buy one yet.

At the Motorhome Show in February 2017 we saw Adam & Sophie at their stand, got chatting and we bought 4G mobile broadband (mifi) pack 2, I think we got a show discount of about £10, an extra £ SIM card and we saved on postage costs.The normal retail price is £299.99

Once home it was put away until Pogo came back from the repairers and we were ready to drill a hole in the roof!

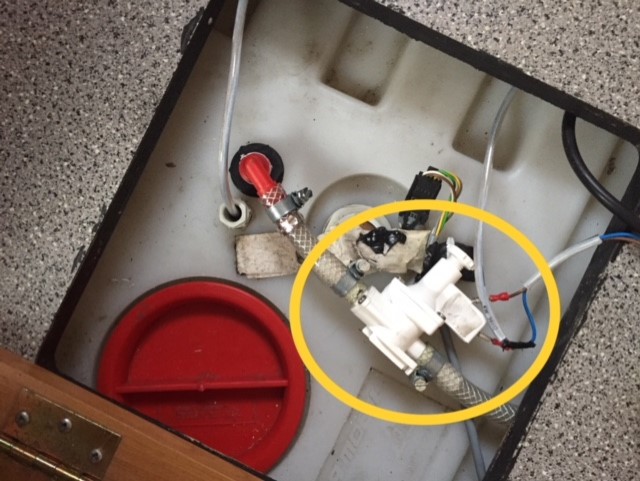
When I was installing the 12 volt USB and running the 12 volt cables from the junction box a few weeks ago I also completed the 12 volt wiring for the mifi- wifi system, including an in-line 5 amp fuse. It was easy enough to do.

240v and 12v junction box, inside the wardrobe

The day to drill a hole in the roof came a few months later, I was concerned about drilling a 25mm hole through the roof though! I had considered removing the roof mounted Sat TV dish and using that roof hole instead, but upon reflection it might cause other problems. There is only one way, I will have to drill a hole!

I must have measured the spot at least 10 times both inside and outside on the roof for a couple of days beforehand, I stood in the bedroom looking down on the roof, I was up the ladders as well. You only get one chance to do this properly so I have to get it right first time.

The mifi (motor-home-wifi) fitting instructions said to ensure there was a 20cm radius from the hole for the roof mount antennae to receive the strongest signal, I thought it might be too close to Sat TV dish and the bathroom skylight, after more time measuring I decided it would be okay.

A week later, here goes then, it is a dry warm day and will be for a day or two, picked up the aluminium base plate, held it up in position in the wardrobe, marked it, got the drill and drilled a 5mm pilot hole (not the hole saw pilot) upwards from inside the wardrobe, stopped once through. I go outside and up the ladders, heart beating fast, hoping all is ok on the roof and I haven’t cocked it up! Ahhh it looks okay and has come out in the right place where I had hoped it would come through! Down the ladders grabbed the drill, put the hole saw in the drill, up the ladders and drilled downwards slowly but on a very high speed, stopping about half way through, it’s advisable to stop and check the hole ensuring there are no wires running through the roof cavity near by, now inside the wardrobe and drill upwards with the hole saw, pop! I am through and I can see the blue sky! (forgot to take photos!)

Clean the roof around the hole in preparation of sticking the antennae in place, wires through the hole in to the wardrobe, through the hole in the aluminium plate. Peel the backing tape off the roof antennae and stick it down on the roof, back inside, screw the plate on the threaded shaft, tighten up. Check the roof and seal, looks okay, now connect everything up, sim in and test……. bingo, it’s working perfectly.

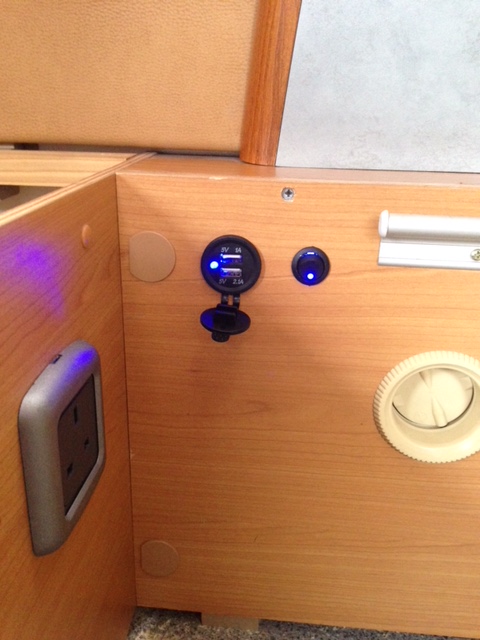
4G wifi in the wardrobe

Jason from Our Tour has a video of his installation on you tube here.

It’s a great piece of kit, can’t wait to use it in Europe, we have used it in the UK and it works brilliantly.

Dave

Whale Water Pressure Switch

We knew there was a problem with the low pressure in the water system, the toilet flush was weak, the kitchen sink taps and shower head flowed slowly.

When the mobile repairer came to fix the list of jobs including the badly wired 240 volt electric socket, the above problems were on the list to remedy (August 2017)

He discovered the micro switch in the shower tap was faulty and has to be replaced, circa £30, whilst we considered what he had told us, he mentioned that if the other tap micro switches fail it will be £30 each time, there are two kitchen and two bathroom taps with micro switches.

Whilst Cathy and I talked about this latest problem, the repairer suggest that we could fit an in-line Whale water pressure switch, the benefit being that even if the other tap micro switches fail later on, the pressure in the water system would remain the same and continue to work as normal.

Well that’s it then, lets fit the in-line pressure switch and eliminate any potential problem further on, how much will it be ? £35 including fitting came the reply, ok please do that then.

The repairer cut the water pipe close to the water pump outlet, amended the wiring and installed the pressure switch.

pressure6

Whale Water Pressure Switch

In our outing to Oswestry in October 2017, we felt there was a difference but only slightly in the water pressure and flow. It was reassuring though that any potential problems with micro switches will not affect the water system.

Dave


Sat Nav – Garmin Camper 760 LMT- D

Well we need a good Sat Nav for our journeys in the UK & Europe, one that works using specific vehicles dimensions, height, weight, and width and this Garmin model fits the bill.

garmin

£259.50 from Ebay

Bought this one from eBay, brand new still in the box, never been used for £259.50 including P & P in July 2017.

rev cam sat nav

A large colour 7″ screen, Cathy can see it from her seat easily enough as well!

When you exceed the speed limit the mph display turns red, mobile speed trap warnings, displays motorways lanes you should be in, especially useful where motorways merge across 4 or 5 lanes. Plus it is pre-loaded with ACSI camp sites data base.

It is positioned close the reversing camera, we are pleased with it so far.

Dave


12 volt USB & Cigarette Lighter Points & Switch

We decided to fit a 12volt USB point near the dining table so we can we can be plugged in and charging whilst we use our mobile devices, iPads and other equipment.

I bought the parts from eBay and wired this in to the van 12 volt electrics myself including the switch and an in-line 3 amp fuse.

usb1

Conveniently there is a 12 volt junction box in the wardrobe, out with the multi meter checked the circuits, etc. I turned the 12 volts off at the control panel, wired the USB and switch together, tested it before fixing them in to the wood panel, it makes sense really.

The reason for turning the 12 volts off is that it prevents me blowing a fuse whilst working on it “live” and if a fuse blows it makes it easier to locate the problem.

It was relatively straightforward, I was a little nervous making holes in the van wood panel, but I just took my time.

The 240 volt socket in the photo was installed by the mobile repairer using CBE parts, it is handy there for our 2 kw electric heater when we are on sites with 240 volt hook up.

(PS  – ensure to use the correct cable flex for this type of circuitry 12 volts, purchased from Auto Electrical Supplies here part no.010723 @ 68 pence per metre)

A few months later I decided to install another 12 volt aux point this time a dual one with a cigarette lighter style and USB.

usb cig

Behind the passenger seat

We needed a 12 volt cigarette lighter charger point that runs off the leisure batteries fed by the roof mounted solar panels for our laptop, our portable Bose speaker and the other 12 volt equipment, we didn’t want to use the cigarette lighter point in the cab as it draws power from the vehicle battery. I mounted it in a discreet position, easy access and close enough not to over stretch the devices charging cables.

Dave


Dash Cam purchased & installed

We had a dash camera installed at the same time as the reversing camera by Lee of DB Audio as it seemed to make sense to have both jobs done at the same time (September 2017).

My mind was on european driving and if were involved in an incident, hopefully we won’t, but having a recording could make our lives a whole lot easier.

I bought a Nextbase dash cam model No. 212 via eBay, it was a refurbished unit from a recommended seller for just £36 against a new unit for £69. it arrived and it looked brand new with no marks or scratches, it even had the the thin film over the screen.

dash cam1

Also purchased a genuine Nextbase hard wire kit for the dash cam via eBay for £11.99 saving £8 against the normal price of £19.99.

Having it hard wired to the vehicles ignition meant that I don’t have to fiddle about with 12v chargers leads, cigarette lighter points and messy wires. Wanted it to be easy to use with a minimum of fuss, it’s a great little unit and don’t forget to buy the correct SD micro card.

dash sat nav

Once mounted it does not obscure our view through the massive windscreen and we don’t notice it’s there now.

The installation and hard wiring by Lee at DB Audio cost £110 and he did a very neat and tidy job with no wires on view, thanks Lee.

Dave